GradSlate Admissions Operations in the Graduate School
Review the sections below to learn about admissions processes for the UGA Graduate School in GradSlate.
Review the sections below to learn about admissions processes for the UGA Graduate School in GradSlate.
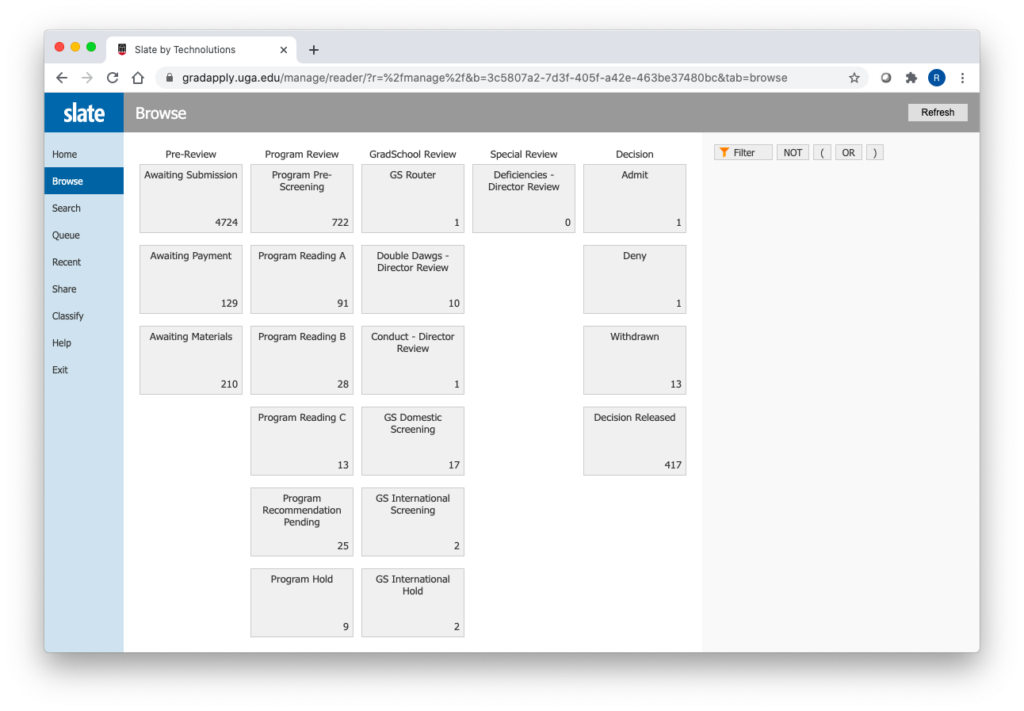
Once a Program Coordinator has filled out a Program Recommendation Review Form in the Pending Program Recommendation Bin, they send it to the GS Router Bin (GradSchool Review column), which runs Rules to move it along to the appropriate Bin for GS Review:
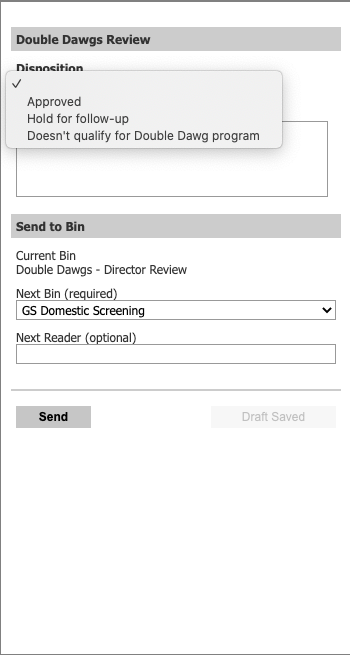
For Double Dawgs applicants, the Admissions Director reviews the information submitted on the Double Dawgs Application page (in the Application tab of the Reader) and fills out the Double Dawgs Review Form (selecting one of the following: Approved; Hold for follow-up; Doesn’t qualify for Double Dawg program; see below) and sends the Application to the appropriate Bin. If Approved or Doesn’t qualify for Double Dawgs program, it moves to the appropriate GS Screening Bin (with a comment for the latter), if Hold for follow-up, it is left in the Double Dawgs Bin. If the response is Doesn’t qualify …, a Rule will run to change the response on the Additional Information / Prior UGA Enrollment section, “If you are currently enrolled at UGA, what is the purpose of this application” to blank (null). If the response is Hold for follow-up, it should be left in the same Bin; when the Admissions Director comes back to it, the first recommendation will be in the Application on the GS Review tab.
Applications that make it to the Conduct – Director Review Bin have statements uploaded by the applicant in the Application tab of the Reader (and displayed on the Conduct Review Form). The Director reviews these statements to make a decision of whether to continue review or not. The Conduct Review Form is filled out (selecting one of the following: Approved without additional documentation; Approved with additional documentation; Approved with dean consultation; Denied with dean consultation; see below) and the Application is sent to the appropriate Bin. Any additional documentation is collected offline, then attached to the applicant dashboard as Material type = ADM Court Docs. If any of the Approved … choices are selected, the Application is sent to the appropriate GS Screening Bin. If Denied … is chosen, the Application is sent to the Deny Bin.

The bulk of the Application review is performed by the GS Counselors in the GS Screening Bins (both Domestic and International):
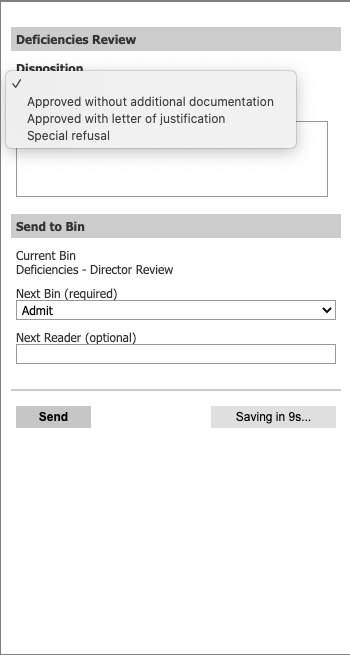
The Admissions Director will conduct this review for all Applications that make it to this Bin. After a review of the Application and the Counselor input, the Admissions Director may make an immediate decision. The Deficiencies Review Form allows choices of (among others): Approved without additional documentation or Special refusal (see below). If one of these is chosen, then the Application is sent to the Admit or Deny Bin, respectively.
If the Admissions Director chooses to ask for a letter of justification (from the Graduate Coordinator of the program), this is handled offline (manually) through email. A received letter should be uploaded on the Application tab of the applicant dashboard (can get there directly from the Reader) as Material type = ADM Dept Ltr of Justification. The Admissions Director then decides whether the letter justifies admission or not and chooses Approved with letter of justification or Special refusal, respectively, and sends the Application to the Admit or Deny Bin, respectively.
After some time, the Admissions Director may choose to stop waiting for a letter, choose Special refusal, and move to Deny Bin.
In all cases, the Admissions Director can add a comment about the decision on the Review Form.
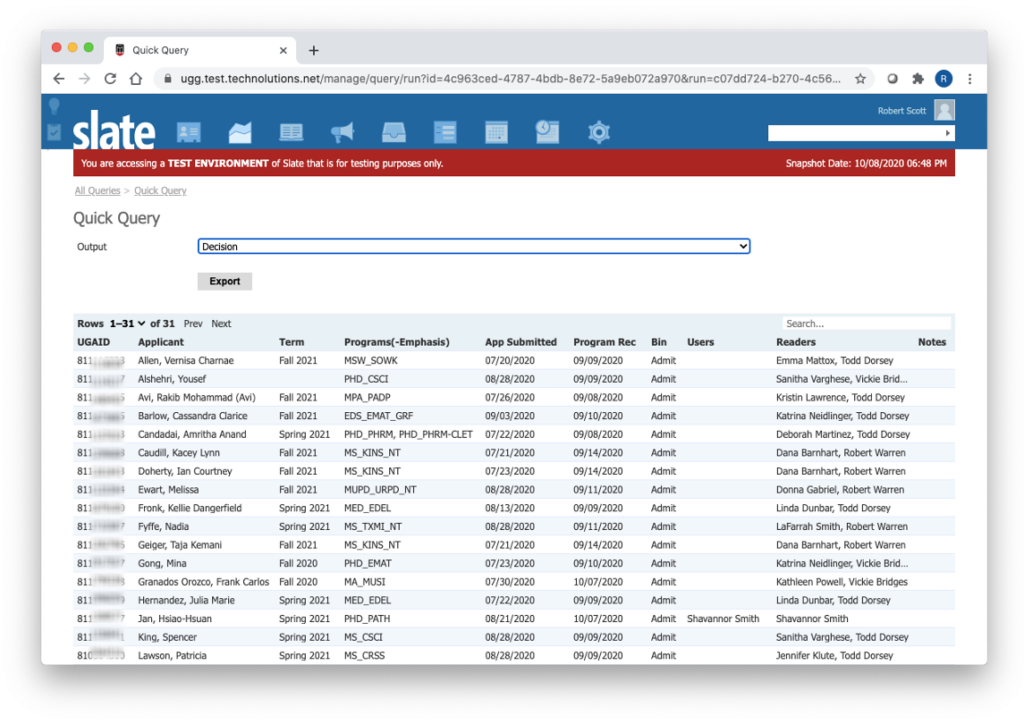
Most common is to assign and release Decisions in batch on some regular basis. A GS Counselor or Admissions Director can open the Admit Bin in the Reader and click the Build Query button in the top margin. This pre-built Query finds all Applications in the Bin (Filters can be used if necessary).
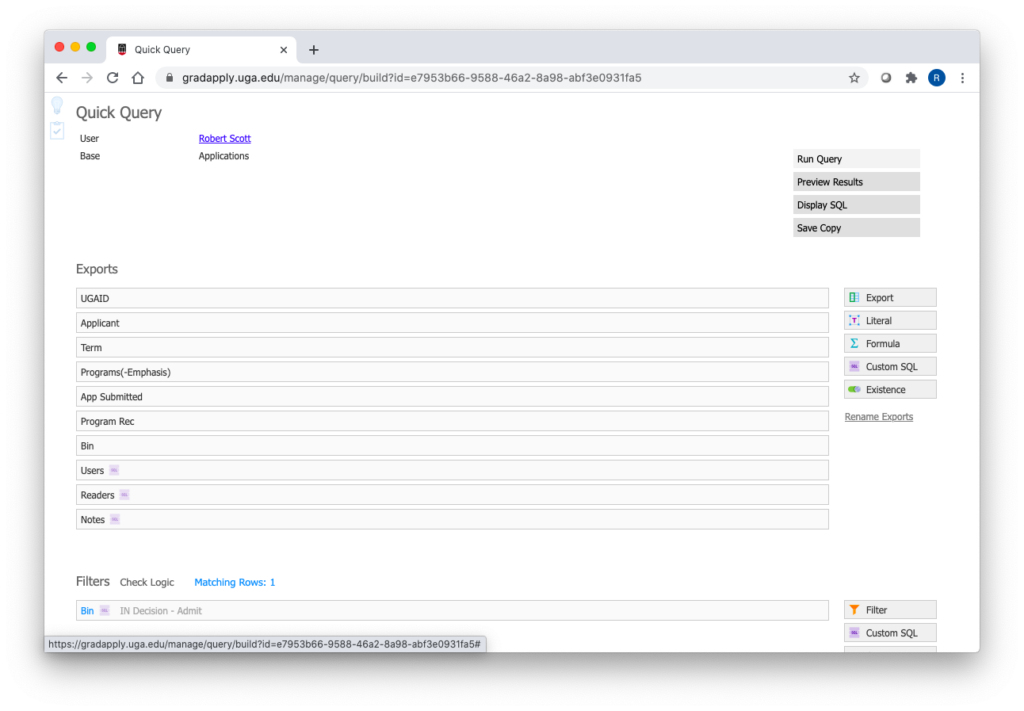
Click Run Query and select Decision (under Batch Management) from the Output dropdown and click Export.
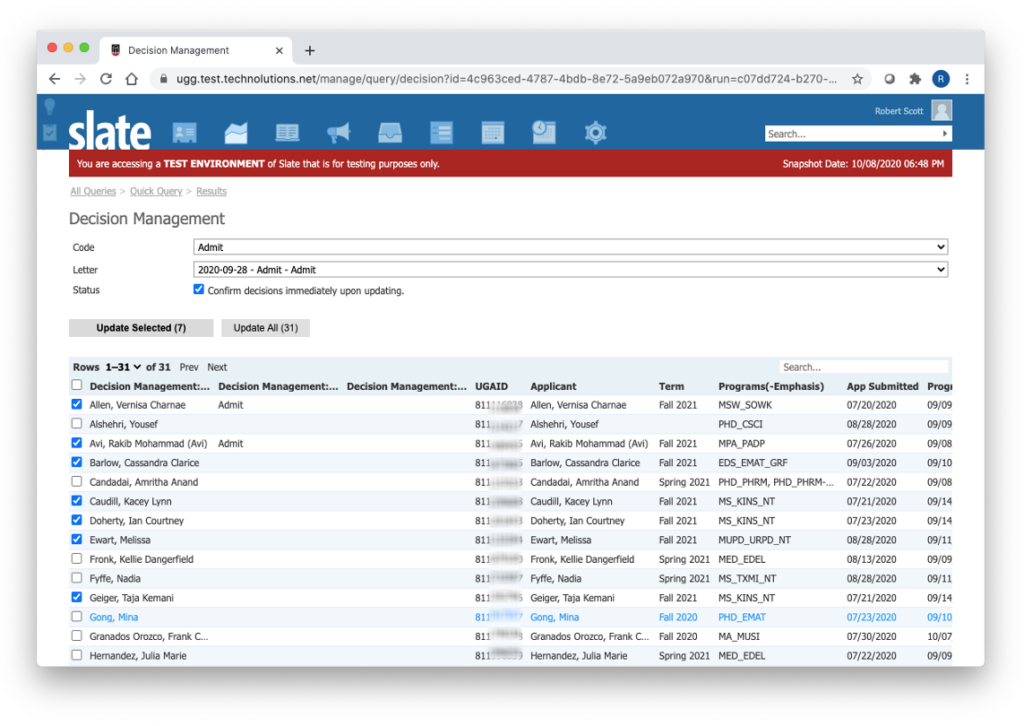
This takes you to the Decision Management page, where you should pick Code = Admit, choose the Letter to assign, and check Status Confirm decisions immediately upon updating. Then, select all the Applications to Admit and click the button Update Selected. (If you make a mistake, you can still undo this confirmation as long as you do not navigate away from this page.)
Records are now moved to Release Decision Dashboard (select Release Decisions from Decision section of Database).
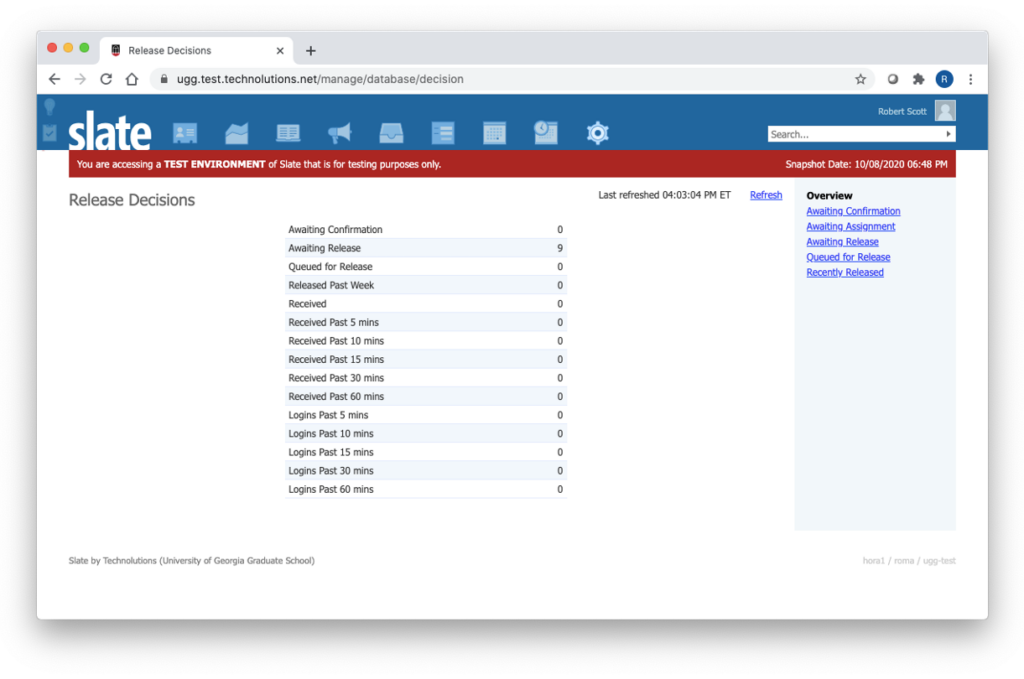
This dashboard is organized into sequential statuses:
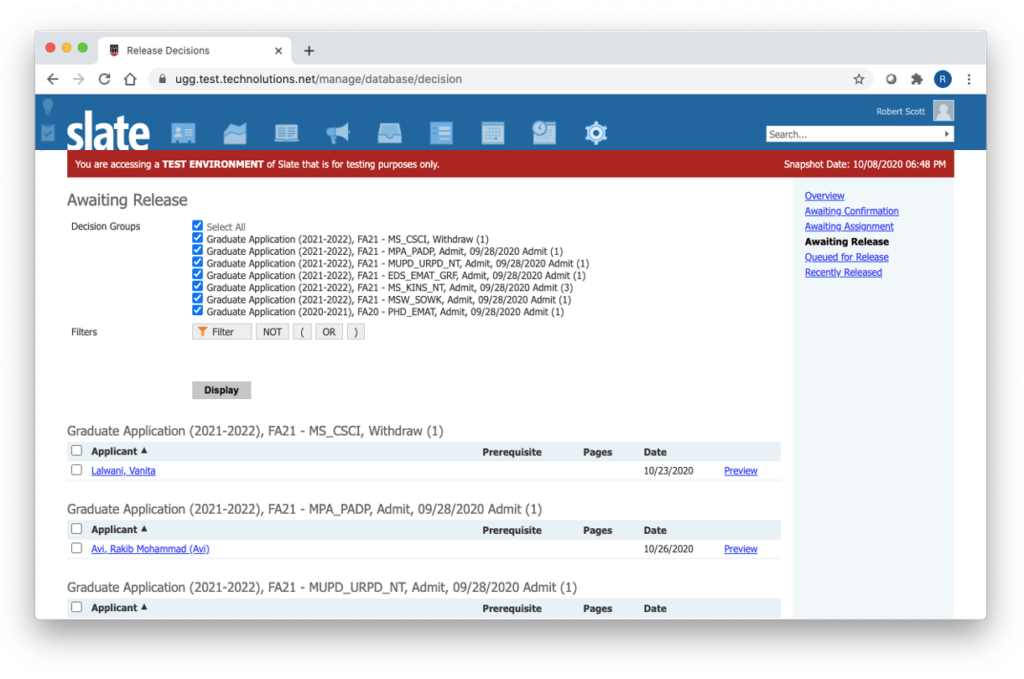
Within each status, Slate will build Decision Groups by Round, Decision Code, Decision Reason, Assigned Letter, etc. You can select Decision Groups and handle the next step in Decision Flow from each status area. If you have not assigned a letter, that can be chosen from the dropdown on the Awaiting Assignment page.
On the Awaiting Release page, you can schedule Decisions for Release. Choose the Decision Groups to work on, then click Display. Select the Applicants for Decision Release and set the Release day/time. You may want to schedule these 15-30 min in the future to give Rules a chance to run.
Once Decision is Released, it takes 15 min for communication rule to deliver messaging. This provides a last-minute chance to revoke if you have made a mistake.
The Release of a Decision triggers an email to the applicant telling them that they have an update to their Application status and they should login to their Status Page and click the link to the new Letter. Once they open the letter, then the Reply Form link appears on their Status Page so they can respond to the offer.
The Reply Form has a field named admit_offer_accept, with prompt values = I ACCEPT my offer of admission OR = I DECLINE my offer of admission. A Rule uses this prompt value to change the Decision Code to Admit / Matric (ACCEPT) or Admit/Decline (DECLINE). The Banner Decision Code = 35 (ACCEPT) or 04 (DECLINE) must be set manually, appropriately checking and or setting the Enrollment Priority Level for 35 (Applicant Accepted Offer). This is described in Post-Decision Workflows using the Banner Enrollment Priority Adjustment workflow.
Denials can be assigned to Applications in the Deny Bin in a manner similar to that described above for Admit. Differences are that Decision Code = Deny, a Decision Reason should be set (individually to either GS Denial or Program Denial), a different Letter will be assigned, no Reply Form will be added to the Status Page, and the Banner Decision Code = 02 (GS Denial) or 12 (Program Denial) should be set in Banner manually.
Decision Codes of Defer and Withdraw are discussed in their own sections of these instructions. Withdrawals are initiated by the applicant filling out and submitting the Withdrawal Form on their Status page. Submission of this form triggers a set of Rules that moves the Application to the Withdrawn Bin and sets the Decision Code to Withdraw. The Banner Decision Code should be set to 08 (Cancel Before Decision), and the Person flag Opt Out should be selected.
The addition of the 35 (Applicant Accepted Offer) admit code in Banner denotes an institutional acceptance and creates a learner record attached to a curriculum. Curricula are stored on priority levels which affect tuition billing and primary / subordinate program rules. Evaluation and adjustment of the priority level depends upon whether the admitted student will be in a dual degree program, is soon to graduate, or has already graduated.
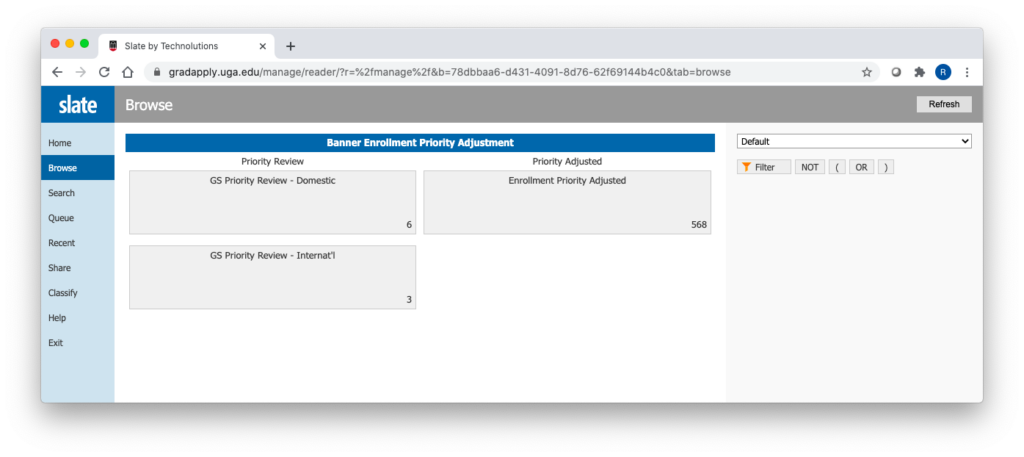
The Banner Enrollment Priority Adjustment workflow in GradSlate guides the work of adjusting enrollment priority levels. Admissions Director and GS Counselor Roles have Permission to access this workflow, which is available by clicking the Reader icon. Applications that have reached the Decision Code of Admit / Matric are placed into two Bins in this workflow, named GS Priority Review – Domestic and GS Priority Review – Internat’l, depending on the applicant’s citizenship. It is from these Bins that the work of enrollment priority adjustment is tracked. All adjustments are made manually in Banner.
The Priority Levels described above may need to be altered depending upon a student’s current or former UGA attendance. A previous UGA student’s Priority Level should be MATCHED to the existing Priority Level on their SGASTDN record if the student has graduated. This will overwrite the former curriculum with the new curriculum. The Priority Level should never be matched to a currently enrolled student’s existing Priority Level UNLESS the new program will REPLACE the current program. Never match priorities on a student with a pending graduation.
These instructions in an abbreviated form are reproduced on the Banner Enrollment Priority Review form:
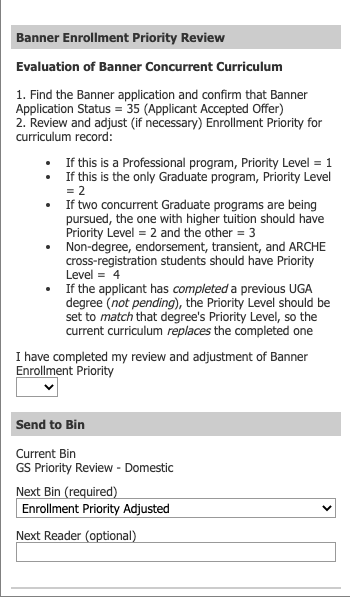
Once the Banner Enrollment Priority has been reviewed and adjusted, the Counselor should answer Yes to “I have completed my review …” and move the Application to the Enrollment Priority Adjusted Bin.
The assignment of a 35 admit code in Banner also triggers a Banner registration hold until a Verification of Legal Presence (VLP) in the State occurs. The Admit / Matric Decision Code in GradSlate also triggers a VLP checklist item. A number of types of documentation can be used to satisfy the VLP. Any documentation submitted by the applicant must be examined by a GS Counselor to confirm that it is acceptable as VLP. We have created the VLP Documentation Review Workflow to handle this process.
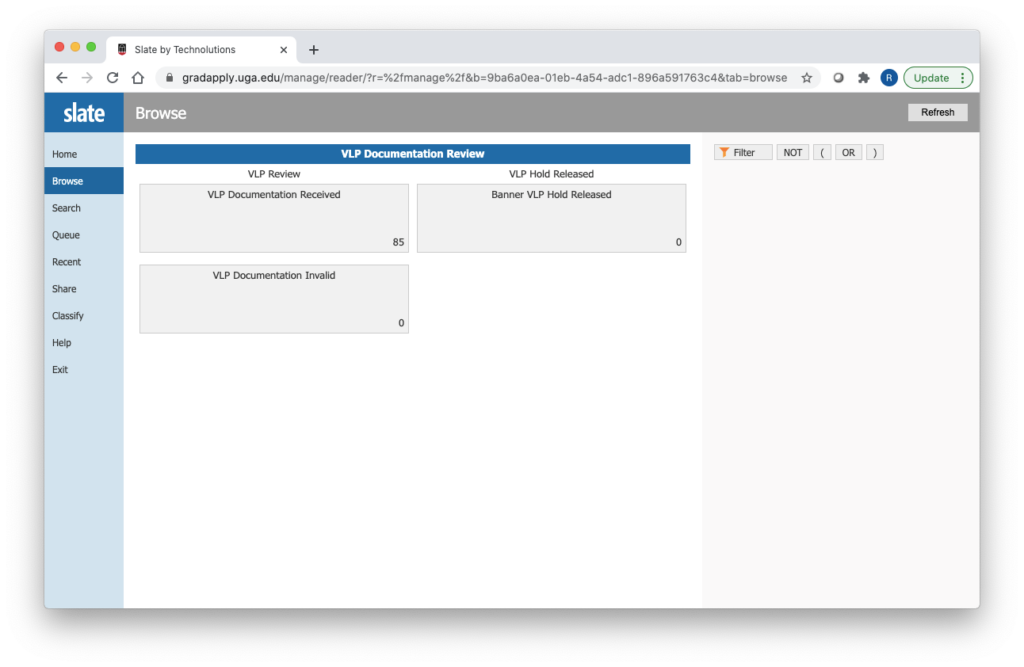
The VLP Documentation Received Bin is filled by Rule with Applications that have Decision Code = Admit / Matric and have a Material uploaded of Material Type = ADM VLP. A Counselor opens an Application in this Bin, adds to Queue, then fills out a VLP Document Review form to report whether the documentation is valid or not.
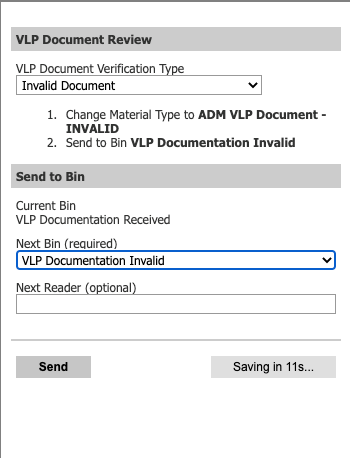
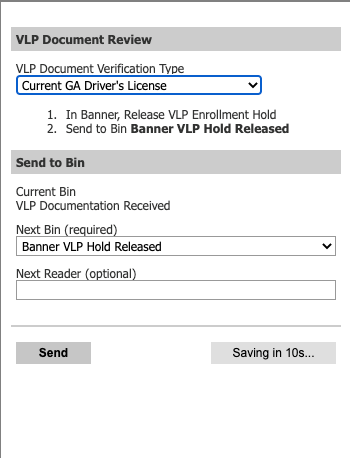
Instructions appear for either choice. For invalid documentation, the Counselor manually changes the Material Type to ADM VLP Document – INVALID, then moves the Application to the VLP Documentation Invalid Bin, where it sits until another Material is uploaded (with Material Type = ADM VLP), moving the Application back to the VLP Documentation Received Bin.
A scheduled Deliver email is set up to inform the applicant when an invalid document has been uploaded. The Recipient List query checks for any new ADM VLP Document – INVALID material types and the email informs the applicants that a different document is required.
Most accepted students must show evidence of completion of an undergraduate degree with an acceptable GPA prior to enrollment. Some students will also have completed a graduate or professional degree and need to show evidence of that. The Degree Completion Review Workflow covers three separate reviews, the details of which depend on the school from which the degree (either undergraduate or graduate) is received:
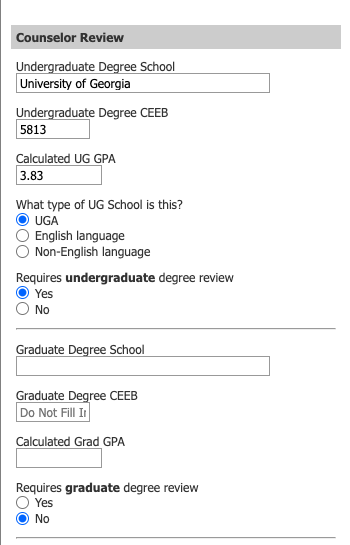
During GS Counselor Screening in the Reader, flags (“Requires (under)graduate degree review”) are set by the Counselor in the Counselor Review form that either or both undergraduate and graduate degrees must be confirmed before enrollment. If this flag is set to ‘Yes’, then the Counselor must also indicate what type of School is the degree-granting School. The School should be looked up in the top field (which will automatically fill in CEEB) and a calculated GPA should be entered. Entry of a School on this form automatically sets it to High Priority and sets the Level of Study, so that Slate knows that this is a degree-granting School.
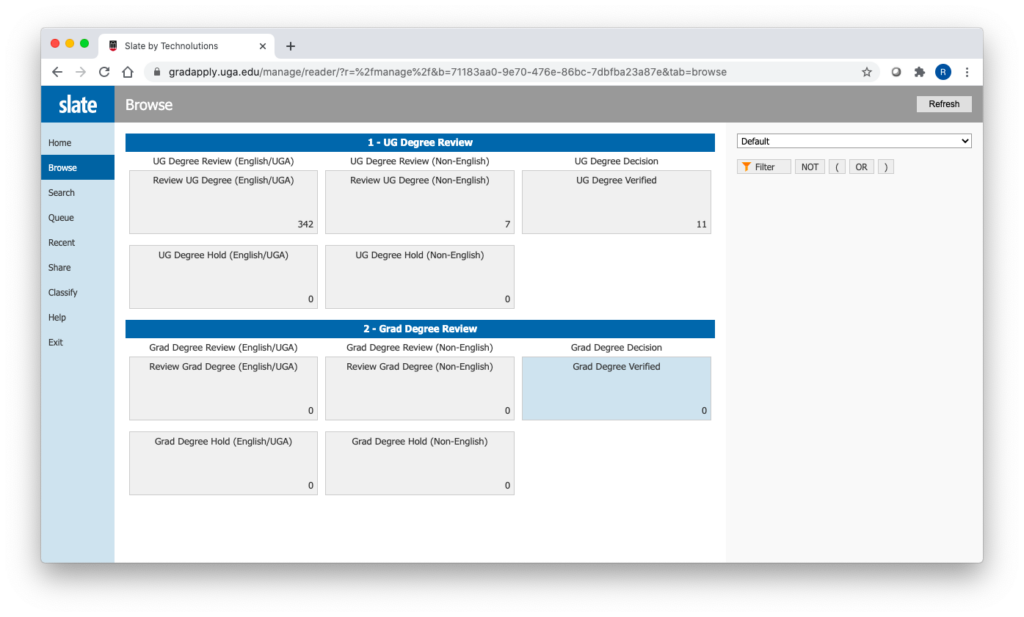
If either of these flags is set to ‘Yes’, this Application will go through the Degree Completion Review Workflow. The path through this workflow depends on whether the School being reviewed is English-speaking (including UGA) or not. If the undergraduate school has a ‘Yes’ flag, then it enters the UG Degree Review section of the Workflow. Once that degree is confirmed, then if the graduate school has a ‘Yes’ flag, it moves to the Grad Degree Review section. In the few cases for which only the graduate school ‘Yes’ flag is set, the Application goes through only the Grad Degree Review section.
Applications are only moved to the Review UG / Grad Degree … Bins when a trigger indicates that they are ready for review. The trigger depends on School type:
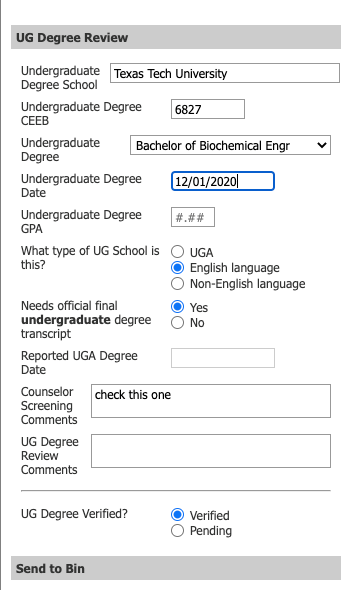
Different Counselors will likely review Applications in the two Review UG / Grad Degree Bins (English / UGA vs Non-English). In either case, they should review either the degree date or the uploaded relevant Material and decide whether this verifies degree completion. The UG / Grad Degree Review form (below) should be filled out, including School, CEEB (these should be pre-populated from the Counselor Review form), Degree, Degree Date, and final GPA. The Verified radio button should be checked and the Application sent to the UG / Grad Degree Verified Bin (once the relevant Banner enrollment holds have been cleared). (If the undergraduate degree completion is being reviewed and this Application also requires review of a graduate degree completion, the Rules should be able to move it to the appropriate Review Grad Degree Bin once a new trigger action occurs.)
If the Counselor is not satisfied with the Materials or UGA degree conferral, they should click the Pending radio button and move the Application to the appropriate UG / Grad Degree Hold Bin while they resolve the concern (offline). The UG / Grad Degree Review form is also available in these Bins to allow verification once the issue is resolved.
Counselor Screening Comments should be pre-populated from the Counselor Review form in the Reader and a new Comment box (UG/Grad Degree Review Comments) is available for any notes about the review of this Application.
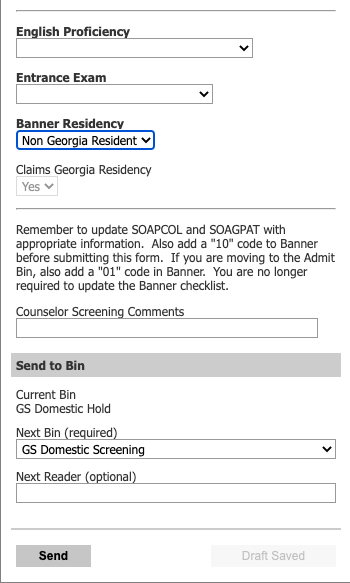
Applicants are asked on the Slate Application whether they will claim Georgia residency (and in-State tuition). Once Banner receives all application data, its algorithms will establish the official decision of whether this applicant has established residency. During Counselor Screening in the Reader, the Counselor is asked to look up and record the Banner Residency decision on the Counselor Review Form (choices are Georgia Resident, International Student, Non Georgia Resident):
In the cases for which the applicant claims Georgia residency but Banner has decided they are either an International Student or a Non Georgia Resident, a note is added to the Status portal that this has occurred and that the applicant has the option of submitting a Georgia Residency Petition (through a Material Upload form). This workflow handles the review of submitted Petitions, which is done by the Admissions Director.
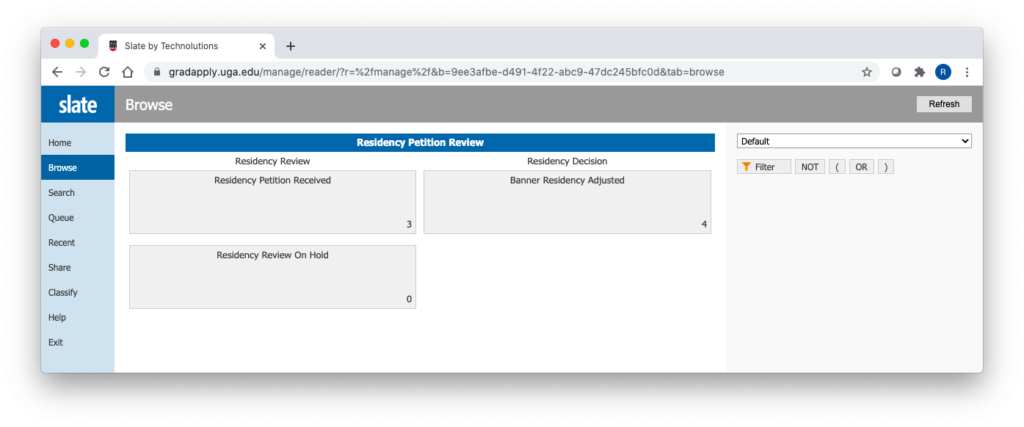
A Rule moves Applications into the Residency Petition Received Bin upon upload of a Material Type of ADM Residency Petition. The Admissions Director looks at the Petition and completes the Residency Petition Review form:
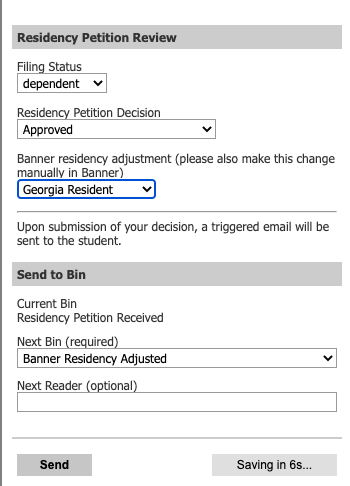
The Filing Status (dependent, independent), Residency Petition Decision (Approved, Denied, Additional Documents Requested), and the Banner adjustment made should be completed. If the Decision is Approved or Denied, the Application should be moved to the Banner Residency Adjusted Bin. A Deliver email is sent to the applicant in either case. For Denied, this provides information on how the decision may be appealed. If the Decision is Additional Documents Requested, the Application can be moved to the Residency Review On Hold Bin until the documents are received or the Petition is withdrawn.
Changes in Intended Term and/or Intended Program can happen at various stages and be initiated by various people throughout the Application process. How these are handled depends on the situation. All of these utilize the Admin Update link in the right margin of an Application tab on an applicant Person Record.

This opens the Administrative Update Form (below the summary data).
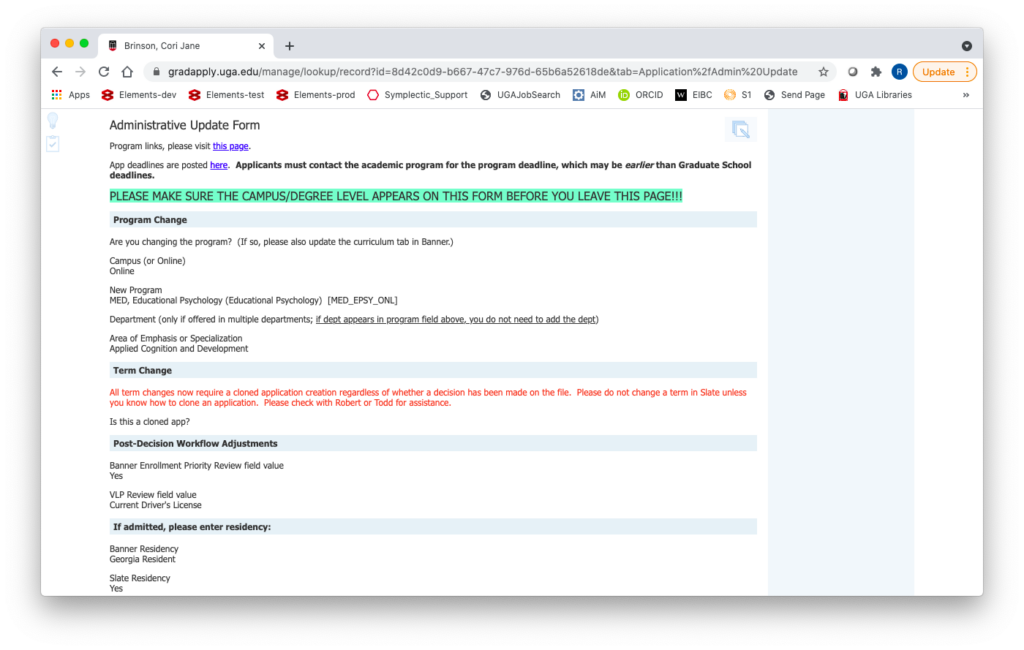
To edit this Form, click the icon at the top right of the form to get to the editable version.
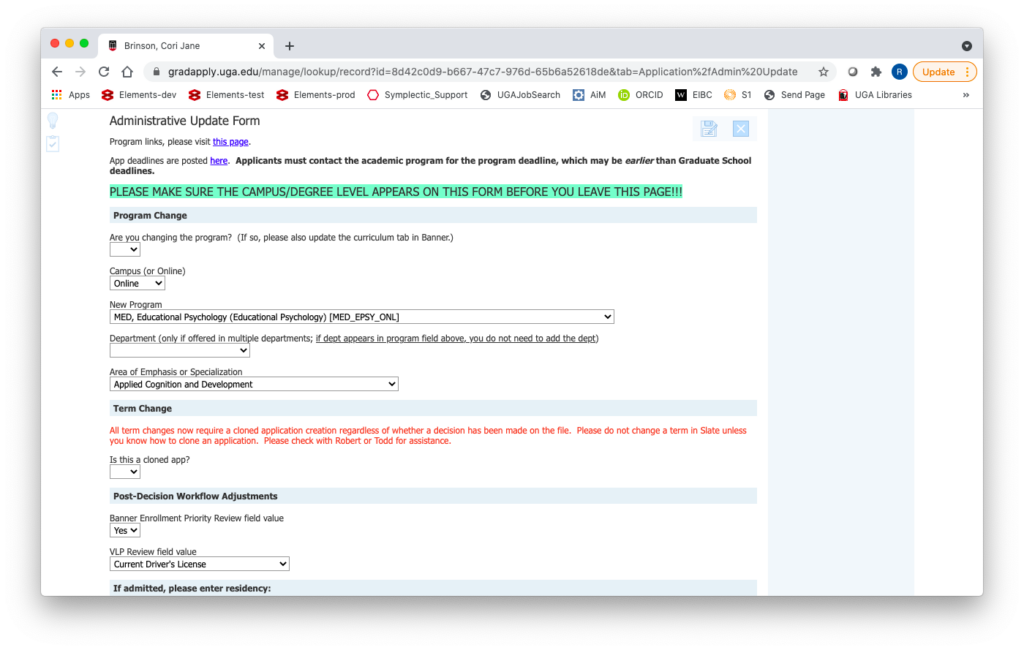
There is a Program Change, a Term Change, and a Post-Decision Workflow Adjustments section of the form; these are referenced in the processes below. A Program Change can occur directly on this form, but a Term Change first requires the Application to be cloned (see below).
When you are done entering changes, use the Save icon at top right (leftmost icon) or the Save button at the bottom of the form.
There are some tools (cloning, Bin movement, adding Decisions, Workflow adjustments) that are common to many of the Term and Program Change procedures; we will cover these tools first.
As noted on the Admin Update portion of the Application on the applicant Record (see above), any change in Term requires cloning of the Application. This will result in two GradSlate Applications and two Banner applications. These will be distinguishable based on status flags.
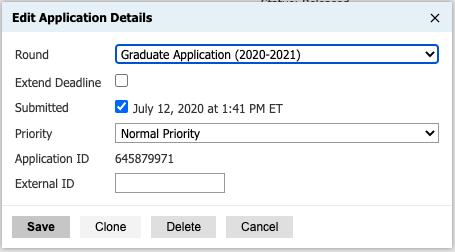
To clone an Application, use the Edit Application Details link (just above Admin Update) in the right margin of the Application tab of the applicant Record. On the popup that appears, click the Clone button at the bottom.
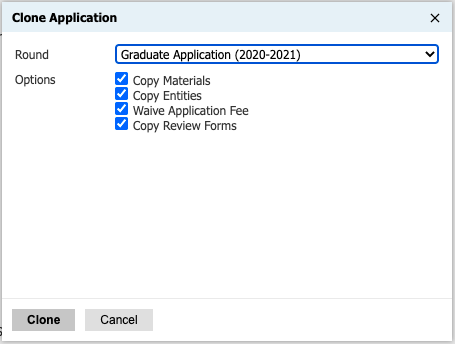
Leave the Round selection in place, check all Options (with one exception discussed later), then click Clone (and CONFIRM). The Person Record will be displayed and a new Application tab (labeled with the Round Short Name) will appear; click on that tab to display the cloned Application (notice that the Decisions are not cloned). Click Admin Update (right margin), click Edit, and select Yes to ‘Is this a cloned app?’ under Term Change (The Yes answer here is the trigger to have the cloned Application transferred to Banner.)
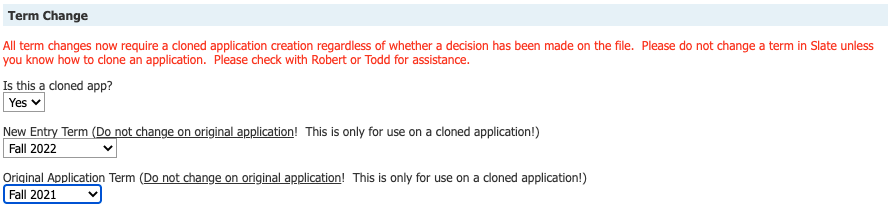
This will open two more fields where you should enter the new Term and the original Term (note the reminder that this information should only be changed on the cloned Application; the original should remain as is). Click Save. This will also trigger the Rule that renames the Application tab for the cloned Application with the Term and Program (this may take a while).
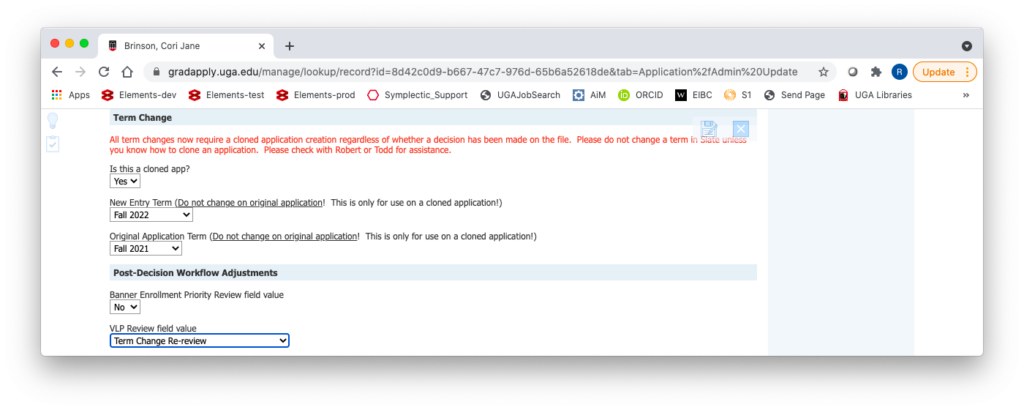
For selected Term changes on an Application that has already had the Decision Released and accepted, some of the Post-Decision Workflows must be re-initiated. This is done by using Admin Update to reset two field values; this will trigger Rules to restart the Banner Enrollment Priority Review and the VLP Documentation Review Workflows.
Under the Post-Decision Workflow Adjustments section of the Admin Update form on the Application tab for the new (cloned) Application, use the dropdown fields to select ‘No’ for “Banner Enrollment Priority Review field value” and ‘Term Change Re-review’ for “VLP Review field value”. Click Save.
Often a Term change will also require that the cloned Application be moved to a specific Bin in the review (Default) Workflow. This can be done administratively on the Application tab. Click the Workflows link (right margin) and scroll down to the Bin diagram.
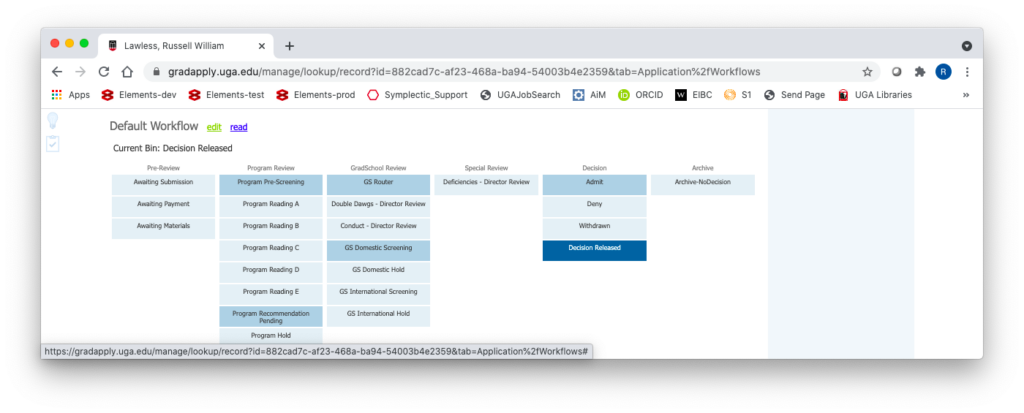
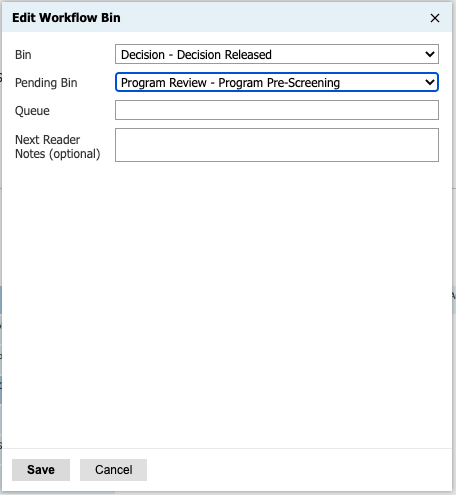
Click the ‘edit’ link after Default Workflow to open the popup that allows choice of Pending Bin. Choose the Bin to which you want to send the Application and click Save.
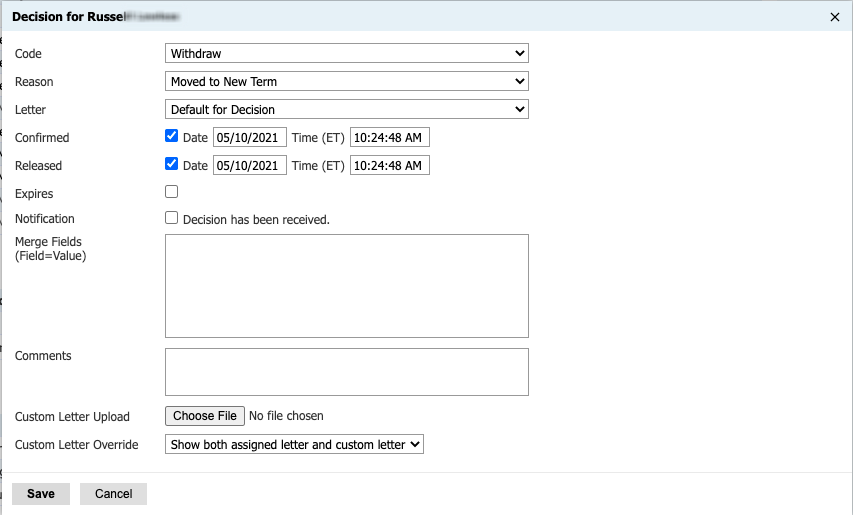
Creating a cloned Application usually implies that a Decision will have to be added to the original (and possibly the cloned) Application. This can be done administratively by selecting the Application tab (Overview), scrolling down to the Decisions list and clicking New Decision.
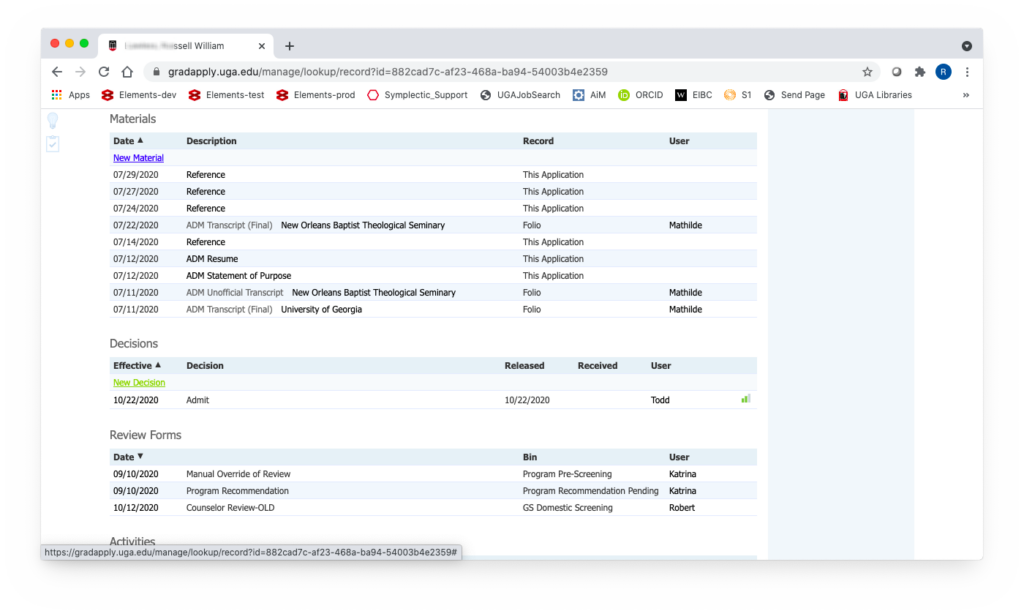
This opens a popup that is used to select the Decision Code and (possibly) Decision Reason.
The procedure for Program change depends on where the Application is in the review workflow.
After submission before Program recommendation
On the Program Recommendation Review Form
After Provisional Decision
After Decision Release before Response (Admit)
If the applicant or Program requests a change in Program after a Decision is released (but before it has been accepted), the process followed depends on whether the new Program is handled within the same Department (this may be a judgment call):
If the review of the revised Application will be handled by the same Department, then
If the Program change moves the Application out of the original department handling it, then the applicant should be asked to submit a new Application to the new Program.
After Response to Released Decision (Admit / Matric)
If the applicant or Program requests a change in Program after a positive response is received (Admit / Matric in GradSlate, 35 in Banner), the process followed depends on whether the new Program is handled within the same Department (this may be a judgment call):
If the review of the revised Application will be handled by the same Department, then
If the Program change moves the Application out of the original department handling it, then the applicant should be asked to submit a new Application to the new Program.
NOTE: If the Program change happens any time after provisional Decision (with an Application Status of Decided, but before Decision Release), the Program Coordinator of the original Program may decide that the revised Application (with the new Program) should go through Program review again. (A new Application will automatically go through this review.) In this instance, unsubmit the Program Reviewer Evaluation forms, the Program Recommendation form, and the Counselor Review form from the Review Forms section of the Application tab of the applicant record. (To unsubmit a Review Form, click it to open the panel, click Edit, then click Unsubmit.) Then change the Application Status to Awaiting Decision so that the Application returns to the Program Pre-Screening Bin.
The procedure for Term change depends on where the Application is in the review workflow. These procedures apply regardless of whether the new Term is before or after original Term. When placing either a Withdraw or a Defer Decision Code as part of a Term Change, you must also choose one of two Decision Reasons: Moved to Future Term or Moved to Previous Term.
Before Program Recommendation
After Recommendation (e.g., on the Program Recommendation Review Form) Before Decision
After Decision Released (no Program re-review)
After Decision Released (with Program re-review)
Identify the student, the School, and the level of study from the transcript, and lookup the Person Record. If you cannot find the student, follow the instructions under Orphaned Transcripts (no existing Person Record) to create a Person Record. Open the Profile tab to check that the School is listed. If it is not, follow the instructions under Add School to Person Profile below before continuing.
Always confirm that the Level of Study is set appropriately based on the transcript being uploaded (Undergraduate, Graduate). This can be set when adding the School or by clicking on the existing School.
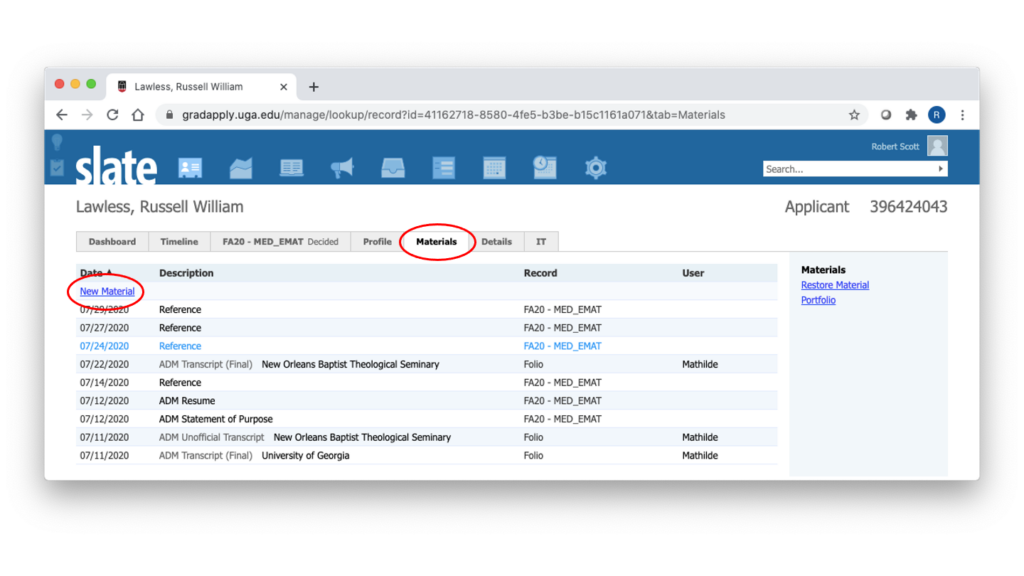
Next, open the Materials tab and click on the New Material link:
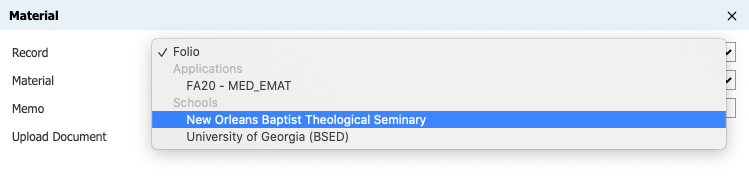
In the Record field on the popup window, use the dropdown menu to find the School to which the transcript belongs:
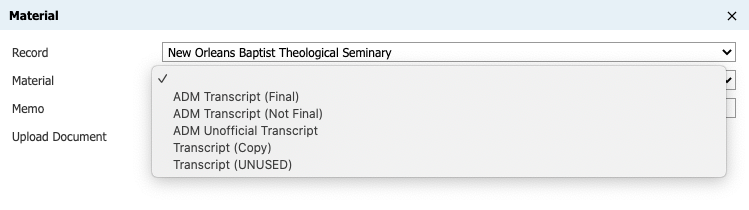
In the Material field, use the dropdown menu to choose:
Click on Choose File (under Upload Document) and navigate to find the transcript file on your computer, then choose Open. Back on the Material popup, click Upload at bottom left.
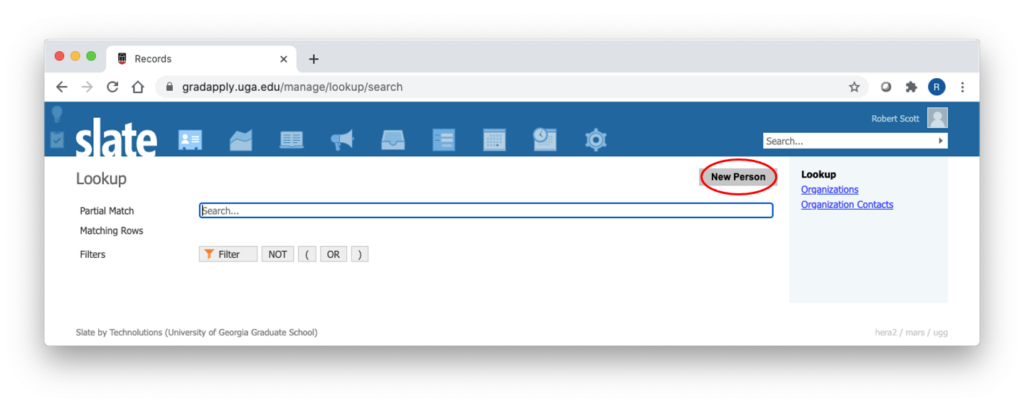
If you receive a transcript for a student that has no Person Record, you will need to create that record by clicking on New Person on the Lookup page:
You will be prompted to enter the following four pieces of data:
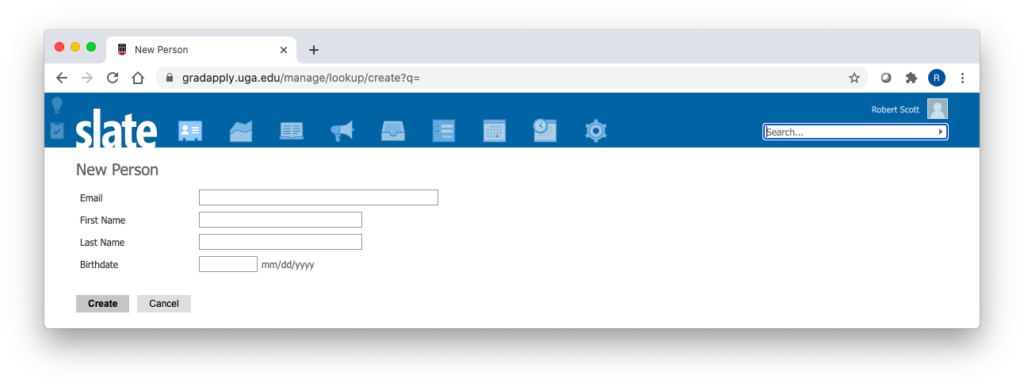
You probably won’t have an email address unless you see one on the electronic transcript transmittal page. You should be able to find First and Last Names and possibly a (partial) Birthdate. Only enter Birthdate if you have month, day, and year. Most records you create will just have First and Last Names.
Once the Person Record is created, follow the instructions in Add School to Person Profile to associate this student with the School on the transcript.
Then go to the Materials tab and follow the steps in the instructions Transcripts associated with existing Person Record to attach the School-scoped transcript to the Person Record.
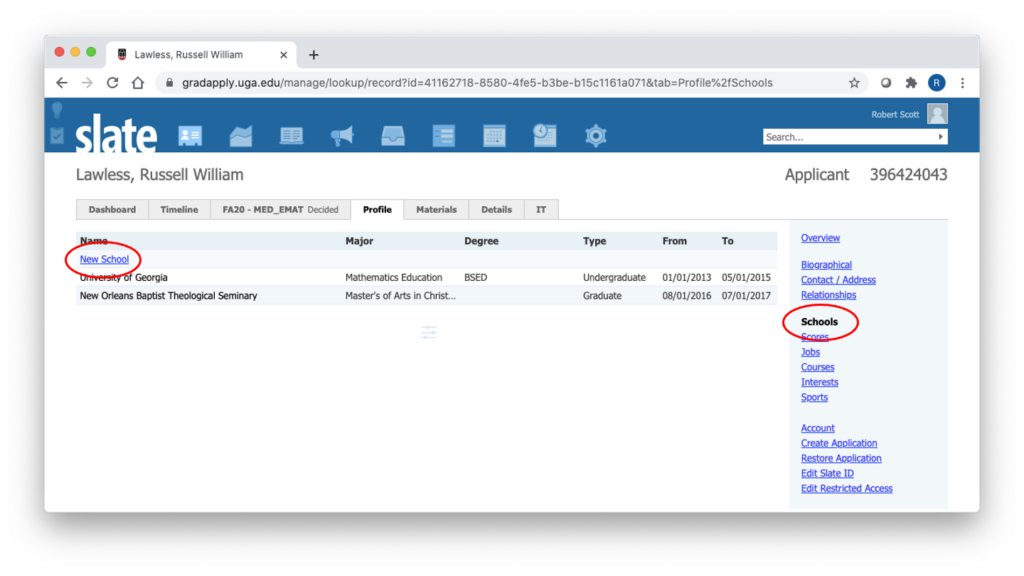
Under the Profile tab of the Person Record choose Schools in the right menu to add the School. On the page that opens, click on New School.
Start typing the name of the school in the Institution field and Slate will suggest a match:
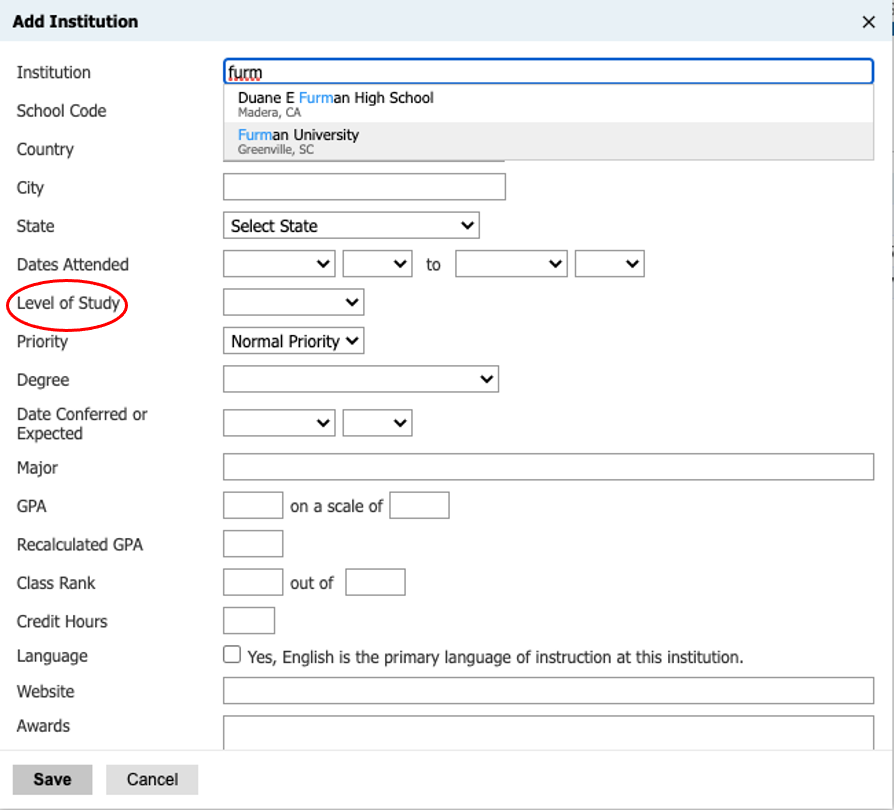
Once you find the School, you must also enter the Level of Study (Undergraduate or Graduate) and click Save.
If you do not find the School, send an email to tdorsey@uga.edu and specify the School that is not in the Slate Organizations dataset. Once he adds it, you will then be able to upload the transcript associated with the correct School.
ARCHE’s Cross Registration Program allows students at member institutions to broaden their academic experience by registering for courses at other member colleges and universities. These courses are typically not offered at their home institution. Registration is handled through a student’s home institution via their Cross Registration Coordinator. Aaron Weimer (aweimer@uga.edu) in the Registrar’s Office is UGA Coordinator. He is the UGA point of contact between the sending institution and UGA.
Cross Registration applicants should complete an abbreviated Graduate Admissions Application on GradSlate. The Program / Term Selection page should be completed for the desired term as shown below:
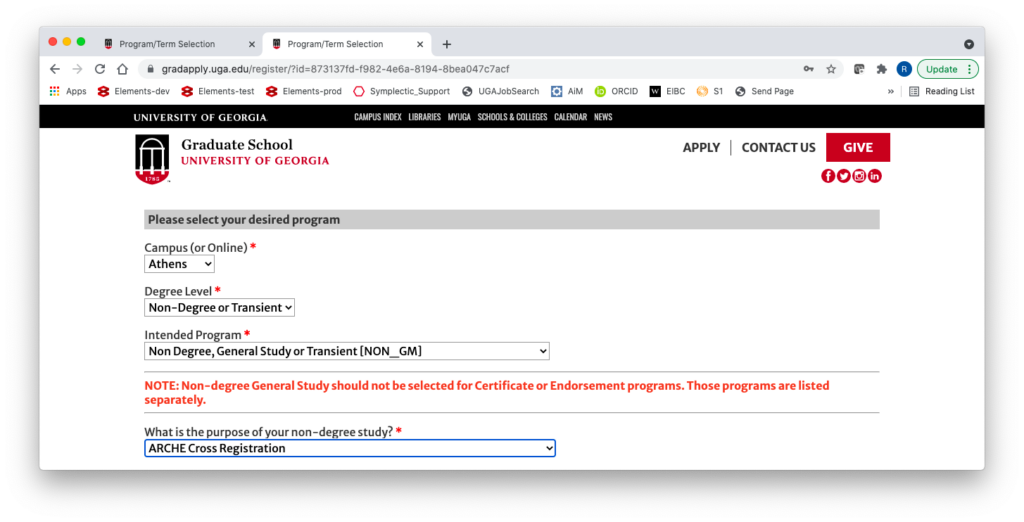
Graduate Admissions will waive the application fee. The applicant should choose “Fee Waiver” as their payment method and “ARCHE Cross Registration” as the Fee Waiver Type. Upload of the ARCHE Cross Registration application from their sending institution (or an email from Aaron Weimer) will suffice as documentation for the fee waiver request.
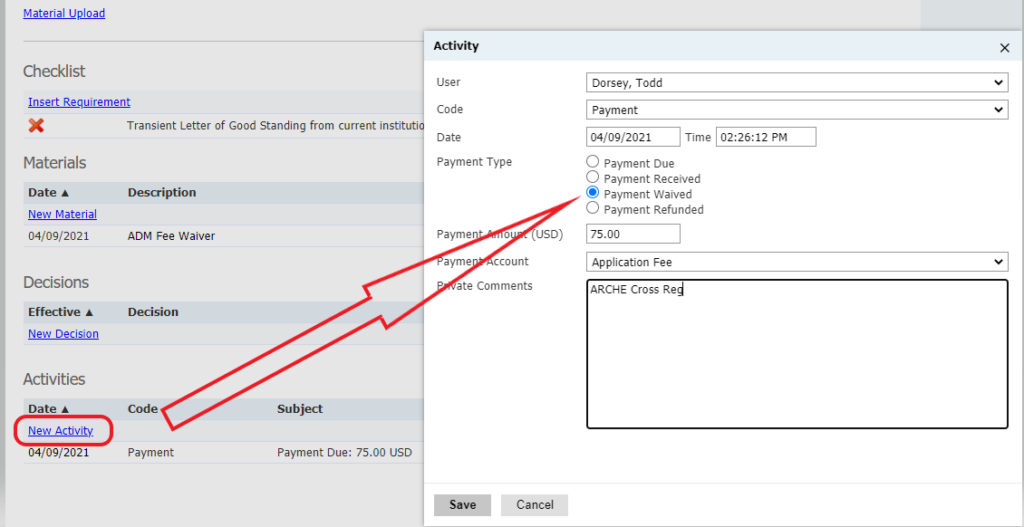
Once the Application is submitted, the application fee needs to be waived and the Checklist item cleared. On the Application tab of the Person Record, add a New Activity, choose Payment for Code, then select the radio button Payment Waived. Add “ARCHE Cross Reg” as a Private Comment and Save.
Next, under the Checklist section of the Application tab, mark the “Transient Letter of Good Standing from current institution” as Received. This will complete the file.
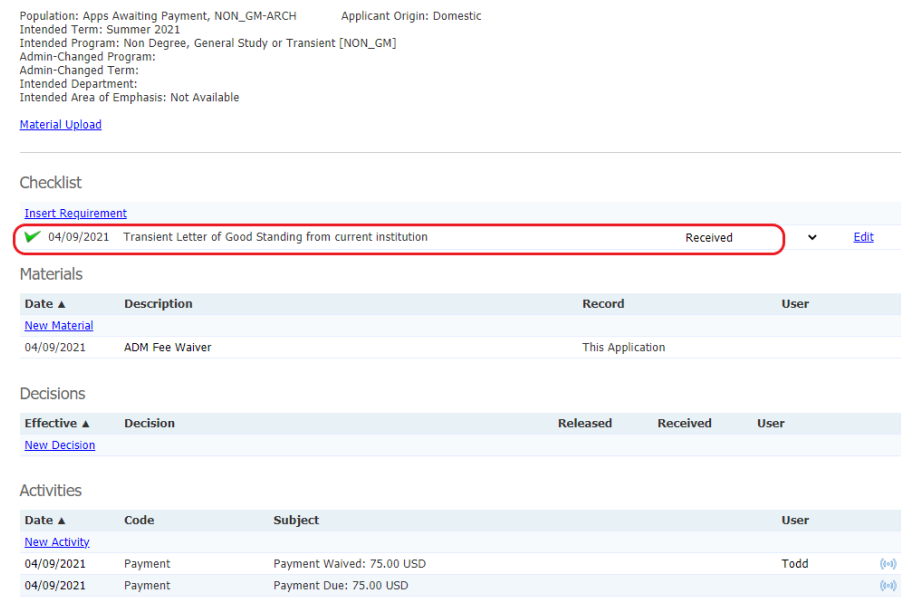
Wait 15 minutes for the Application Status to change from Awaiting Payment to Awaiting Decision (or you may Force Execute a Rules Refresh on the record to speed this up).
Next, click the Workflows link in the Right Navigation Pane on the Application tab and Edit the Default Workflow to place the file in the Program Recommendation Pending Bin.
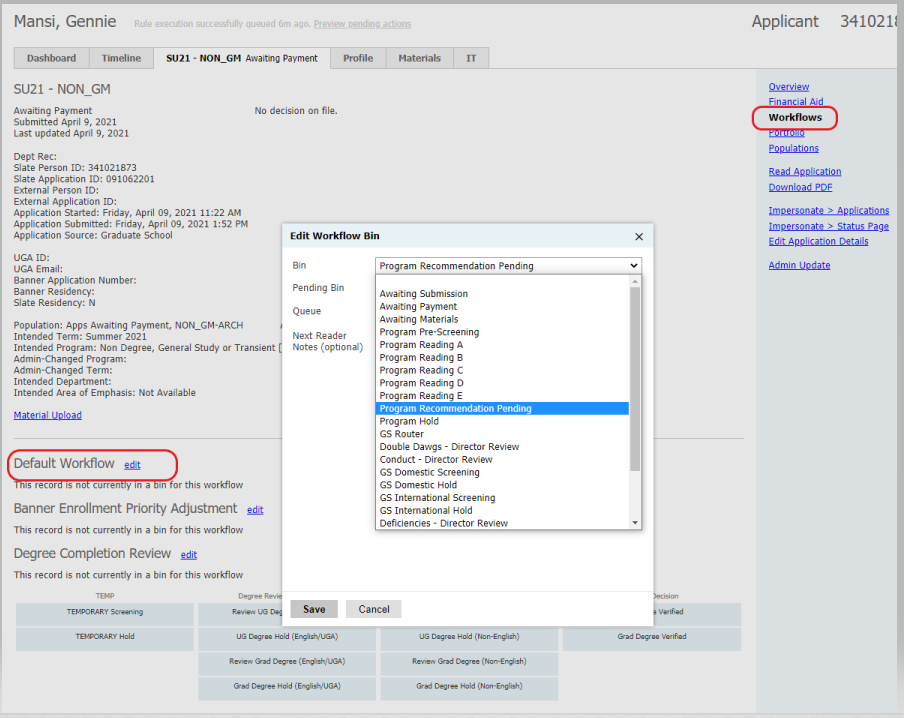
Todd Dorsey acts as Program Coordinator for these Applications (Population = NON_GM-ARCH). Once a Program Recommendation is submitted, they will move into the appropriate GS Screening Bin.
There is no need for the normal GS review of these Applications. Instead, go to the Application tab of the Person Record and under the Decisions section, enter a New Decision of Admit, then execute the Decision Flow (choose the Admit template for the Letter, Confirm and Release the Decision).


